What is Leverage Browser Caching?
When a web browser load any web page it has to load several resourses like images, fonts, js file, CSS file, and other attached resources into your browser’s local cache. What browser caching does it “remember” the resources that the browser has already loaded. When a visitor goes to another page on website your logo, images, fonts, CSS files, etc. do not need to be loaded again, because the browser has saved them already. All this recourse will call from browser cache not from server. This is the reason that the first view of a web page takes longer than repeat visits.
Leverage browser caching, enables your web page files will get stored in the browser cache locally. Your pages will load much faster for repeat visitors and so will other pages that share those same resources.
If you have tested your web page for speed and found out that you need to leverage browser caching, here is how you do it.
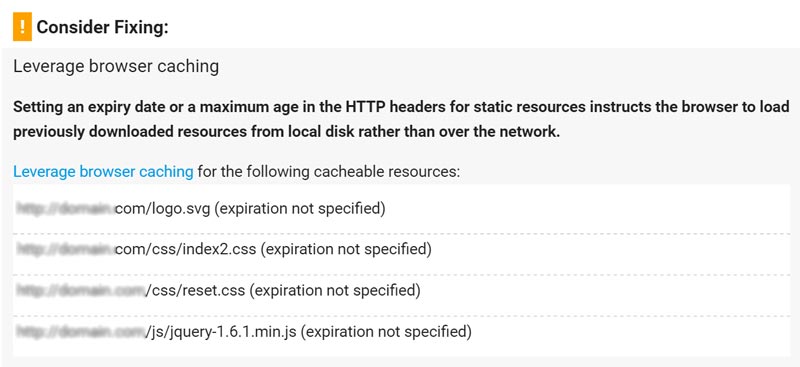
The Leverage Browser Caching Warning?
The warning generate itself when your web server, or a third-party server, doesn’t have the correct HTTP cache headers implemented. Or the expires headers might exist, but the cache time is set too short. The most common reason is that your web server is not correctly configured. The second one is that the Google Analytical script gives us the warning. And the third is other third party scripts returning the warning.
How to Fix the Leverage Browser Caching Warning.
When it comes to fixing the leverage browser caching warning there are a many different scenarios, that are usually used to solve this issue.
1. Adding Cache-Control Header in Nginx
You can add Cache-Control headers in Nginx by adding the following to your server config’s server location.
|
1 2 3 4 |
location ~* \.(js|css|png|jpg|jpeg|gif|ico)$ { expires 2d; add_header Cache-Control "public, no-transform"; } |
2. Adding Expires Headers in Nginx
You can add Expires headers in Nginx by adding the following to your server block. In this example, you can see how to specify different expire times based on file types.
|
1 2 3 4 5 6 7 |
location ~* \.(jpg|jpeg|gif|png)$ { expires 365d; } location ~* \.(pdf|css|html|js|swf)$ { expires 2d; } |
3. Adding Cache-Control Headers in Apache
You can add Cache-Control headers in Apache by adding the following to your .htaccess file.
|
1 2 3 |
<filesMatch ".(ico|pdf|flv|jpg|jpeg|png|gif|js|css|swf)$"> Header set Cache-Control "max-age=84600, public" </filesMatch> |
4. Adding Expires Headers .htaccess
You can add Expires headers in Apache by adding the following to your .htaccess file.
|
1 2 3 4 5 6 7 8 9 10 11 12 13 14 15 16 |
## EXPIRES HEADER CACHING ## <IfModule mod_expires.c> ExpiresActive On ExpiresByType image/jpg "access 6 month" ExpiresByType image/jpeg "access 6 month" ExpiresByType image/gif "access 6 month" ExpiresByType image/png "access 6 month" ExpiresByType text/css "access 6 month" ExpiresByType application/pdf "access 6 month" ExpiresByType application/javascript "access 6 month" ExpiresByType application/x-javascript "access 6 month" ExpiresByType application/x-shockwave-flash "access 6 month" ExpiresByType image/x-icon "access 6 year" ExpiresDefault "access 30 days" </IfModule> ## EXPIRES HEADER CACHING ## |
Here is the list of the most common file-types or mime-types for Expire Headers.
[paypal-donation]